Stage7
record
Record your progress while training.
Record your workout as you perform the menu displayed in the "Workout" tab. (Today's menu is automatically set according to your plan settings at the start of each new day .)
Tap "Start".
(When recording a new location) Check your current location on the displayed map and register the location.
Tap the menu item you want to perform.
Perform the displayed set of exercises. For core training and cardio, tap ▶︎ to start the time count.
Once you've finished a set, tap the screen to start counting down the interval time. During this time, adjust the actual load and number of reps as needed using the + and - buttons.
Once the interval time has elapsed, the contents of the next set will be displayed. Repeat steps 4 and 5 until all sets of the exercise are completed.
Once all sets are complete, the screen will close and you will return to the menu list. Repeat steps 3 through 6 until all menus are finished.
Once you have completed all events, tap "Stop" (or "End Recording" on Apple Watch).
Record after training
Record the menu for today, which is displayed in the "Workout" tab, after you've completed it.
-
Select the items from today's menu that you want to mark as completed.
-
Tap "Mark as completed" at the bottom of the set list.
If recorded later, it will not be recorded in Health.
Add past records
I will add the records of the training I did before today.
-
Select the "History" tab.
-
Display the months you want to add on the calendar.
-
Tap the "Add Record" button in the upper right corner of the screen.
-
On the displayed record addition screen, select the date to add, the start time, and the menu to add (planned date of the plan). ( Only dates for the currently displayed month can be selected. Please display the calendar for the month you wish to add beforehand.)
-
Tap the "Add" button in the upper right corner of the screen.
-
If necessary, you can view the date of the added record and add, delete, or modify the content of the events.


Apple Watch


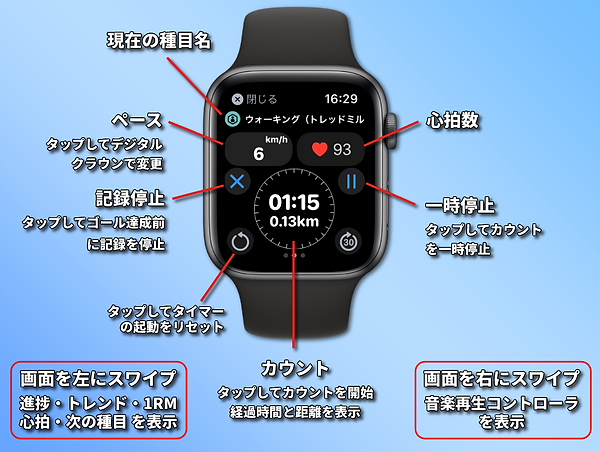
Today's menu creation
Menus added automatically
Today's menu is listed on the Workouts tab.
Menu set for the day of the week according to the workout plan set in My Plan
(For plans that are not fixed to the day of the week) The menu for the next day that was last executed is displayed.
(If the menu is not set in My Plan, nothing is displayed.)
You can change today's menu in the following ways:
Change of planned date
Copy history
Menu reset
Individual addition / deletion of menu
Change of planned date
You can replace it with the menu of another day of the week set in My Plan.
"(…)"Tap.
Select Change Planned Date.
Each day of the week set in My Plan is displayed in a list.
Select the day of the week you want to change.
Tap "Change".
Copy history
You can copy and replace the menu from the history (records made in the past).
"(…)"Tap.
Select Copy History.
The records for the last 7 times are displayed in a list for each day.
Select the (past) implementation date you want to change.
Tap "Copy".
Menu reset
You can discard the changes you made and revert to the original menu.
-
"(…)"Tap.
-
Select "Reset Menu"
Individual addition / deletion of menu
You can add / remove menus one by one. When adding, you can copy what you have done in the past.
Unnecessary menu Tap the trash can icon to the right of the item name to delete the unnecessary menu.
Tap Add Menu.
Select the "part" you want to train.
Select the "device" to use.
Select "Event".
(Tap "What is ..." to display the video search results for the event.)
Select "Last time" to copy what you have done in the past.
Select "Σ Maximum" to copy the implementation content that recorded the maximum total load.
To set new contents, select "Default" and set the load, rep (number of times), interval time, and number of sets.
(You can set the load in lbs by selecting "lbs" in "Load Unit")
Tap "Add".
If you have purchased the premium plan, you can select "Recommended". You can set the recommended load and reps based on the 1RM estimate.
Instead of selecting a part / instrument, you can search by entering a part of the item name in "Menu Search".
Plan creation
Sample plan
You can select and use a sample plan during setup. You can freely change the sample plan.
To remove the sample plan menu
Swipe left on the menu (line of event name).
Tap "Delete" displayed on the far right.
Add menu
You can add a menu for each day of the week (~ day) of the plan.
Tap the day of the week (~ day) to add.
Tap "Add Menu" at the bottom of the menu list.
Select the "part" you want to train.
Select "Event".
(Tap "What is ..." to display the video search results for the event.)
Select "Last time" to copy what you have done in the past.
Select "Σ Maximum" to copy the implementation content that recorded the maximum total load.
To set new contents, select "Default" and set the load, rep (number of times), interval time, and number of sets.
(You can set the load in lbs by selecting "lbs" in "Load Unit")
Tap "Add".
(If you have purchased the premium plan, you can select "Recommended". You can set the recommended load and reps based on the 1RM estimation.)
Change the set
You can change the set contents of the added menu.
Tap the menu (item name).
The set contents are listed.
Change the load, rep, and interval values to be changed.
Add set
You can add a set to the added menu.
Tap "Add set" displayed below the set contents list.
The set that copied the contents of the last set is added to the end.
Delete set
You can delete the set from the menu you added.
In the set contents list, swipe left on the row of the set you want to delete.
Tap "Delete" displayed at the right end.
Copy menu
You can copy an existing menu to another day of the week.
Tap "(...)" on the set contents list screen.
Tap "Copy to another planned date".
Select the planned copy destination date
Build a super set
Two events can be set as a pair (super set / compound set), and two events can be input alternately one set at a time during recording.
Tap "(...)" on the set contents list screen.
Select "Build a superset".
Select the event you want to pair from the list and tap "Set".
Copy of planned date
You can duplicate an existing planning date (per set menu).
Tap "(...)" on the menu list screen of the planned date to be duplicated.
Select "Copy of" ◯ day of the week "".
The duplicated planning date is added to the end of the planning date list.
Planned date / menu order change
You can change the planning date and the order of the menus.
Tap "Edit" at the top right of the screen.
Drag the "three" displayed at the right end of the menu (item name) up or down to the position you want to change.
Plan settings
Plan name / description
Tap "(...)" at the top right of the My Plan screen and select "Set (plan name)" from the displayed menu to display the plan setting screen. On this screen, you can make detailed settings for the current plan.
Enter the name of the plan in the "Plan name" field.
Enter a descriptive text in the "Settings" field.
Tap Training Objectives and select a training objective from the list.
(The number of rep (number of repetitions) and recovery time will be guided according to the settings)Tap "Guide method" and select a guide method from the list.
(Set the set contents in today's menu according to the setting)To create a plan that does not lock the menu to the day of the week (circulates every 3 to 30 days regardless of the day of the week), tap "Do not lock to the day of the week" to turn it on (slide to the right).
(You can create a "split menu" that circulates by the number of split body parts)If you do not want to circulate (do not return to the first day after the last day), tap "Repeat" to turn it off (slide to the left).
Planned date name
You can set a name for the planned date.
Select the planning date to be set in My Plan.
Tap "(...)" at the top right of the screen.
Select "Set" ◯ day of the week "".
Enter a name in the Planned Date Name field.
Rest day
You can set a "rest day" for the planned date. The rest day menu is not set to today's menu. The next day (even if the plan is not fixed to the day of the week), it will automatically advance to the next planned day.
Select the planning date to be set in My Plan.
Tap "(...)" at the top right of the screen.
Select "Set" ◯ day of the week "".
Tap "Resting Day" to turn it on (slide to the right).
Plan management
Plan addition
Tap "(...)" at the top right of the My Plan screen and select "Add / Remove Plans" from the displayed menu to display the plan management screen. You can add, delete, export and import plans on this screen.
To add a new plan, enter the name of the plan in "Plan name" in the "Add plan" field and tap the "Add" button.
To add a new plan that is a copy of the current plan, tap "Duplicate ~" in the "Add Plan" field.
To add a sample plan built into the app, tap Add Sample Plan in the Add Plan column and select a plan from the list.
プランのコピー
作成済みのプランをコピーして新しいプランを作成できます。
-
コピーするプランをタップして選択します。
-
画面右上の「(…)」をタップ、表示されたメニューで「このプランをコピー」を選択します。
Plan sharing
Export: Outputs the current plan as a file. The output plan can be passed to other users or saved as a backup.
Tap "Export ...".
Select the sharing method (AirDrop / Email / Message / Save file, etc.) on the iOS sharing screen that appears.
Load: You can load and add a plan output as a file. You can also load plans output by other users.
Tap "Load".
On the iOS file selection screen that appears, select the file for your plan.
プランの共有
現在のプランをファイルとして出力して、他のユーザーと共有したりバックアップとして保存できます。
-
コピーするプランをタップして選択します。
-
画面右上の「(…)」をタップ、表示されたメニューで「このプランを共有」をタップします。
-
表示されるiOSの共有画面で共有方法(AirDrop/メール/メッセージ/ファイル保存など)を選択します。
Delete plan
You can delete plans that you no longer need.
Tap "Delete".
Select "Yes" in the deletion confirmation message
Switch plans
You can switch between multiple plans that you have added or created.
Tap "(...)" at the top right of the My Plan screen.
Select "Switch Plan".
Select one of the listed plans and tap "Change" at the top right of the screen.
Photo recording
Taking a photo
After performing (recording) your workout, you can take a picture and record it along with your workout.
Tap the "Shoot" button displayed at the bottom of the menu list.
The screen switches to the camera (shooting viewer).
Take a photo.
If you start taking a photo on your iPhone with My Workout running on your Apple Watch, the remote control screen will appear on your Apple Watch. You can perform immediate shooting and timer shooting on this screen. (The number of seconds of the timer can be changed with the digital crown)
View / retake / delete photos
Tap the "Photos" button on the workout screen to see the recorded photos.
Tap the photo to switch the screen to the photo viewer.
Pinch out to enlarge the photo (pinch in to reduce it).
Tap the shooting (camera) button at the bottom center of the viewer to switch the screen to the camera (shooting viewer) and take a picture again.
You can delete it by tapping the trash can button at the bottom right of the viewer.
You can share your photos by tapping the share (up arrow) button at the top right of the viewer and selecting the app you want to share (AirDrop, SNS, etc.).
Photo comparison (sharing before and after images)
You can compare the two recorded photos side by side.
Tap the "Photos" button on the workout screen to see the recorded photos.
Tap the photo to switch the screen to the photo viewer.
Tap the compare (■ □) button at the bottom left of the viewer.
The recorded photos are listed at the bottom of the screen (in order from the newest photo).
Select the photo you want to compare from the list.
The selected photo will be magnified in the lower half of the screen.
In this state, tap the share (up arrow) button at the top right of the screen to create and share before-after images (old photos on the left and new photos on the right).